

I hope everyone had an amazing holiday break and are now ready to get back to work!! HA!
I have been thinking a lot about what I want for myself in this new year, and I have a lot of creative goals...one of them being keeping up with my Techniques Blog! So I have spent the last week brainstorming away all the new and fabulous things I can pass along to you!
I am going to start simple this week. Using something all of us have loads and loads of sitting in our stash. In fact, I may have done this technique before - or something similar - because it is just so darn great.
You will need:
- a pencil
- a whole bunch of brads, any shape or size, all coordinated with your layout
- a paper piercer, hole punch, scissors, etc. to make a hole for your brad
Step One: Draw a line on your page where you want your line of brads to go. You might want to lay out your layout before you do this, so you know where you want the brads to go. And we use the pencil because we can erase it if we don't like our first try! Or our third, or fourth...
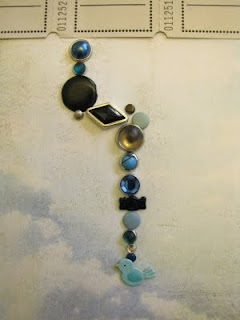
 Step Two: Choose some brads from your stash that will go well with your layout, and start laying them out on your line so you get an idea of size and colour placement. Again, this isn't the final step, so feel free to play around with placement until you get something you like. You can change your mind right up until you punch the hole!
 Step Three: Start on one end of your line, and punch a hole for the first brad. I marked my hole with a pencil before I punched it, so I got it just in the right place. Lay your brad over top of the pencil line, eyeball where the centre is, then mark it with a dot. Now make that hole!!
 Step Four: Keep going, one brad at a time until you reach the end. I wouldn't recommend going at it from each sides and then meeting somewhere in the middle. Because then you need to make sure you've got a brad that fits in whatever hole is left! Better you just shorten or lengthen the line based on where you end up.
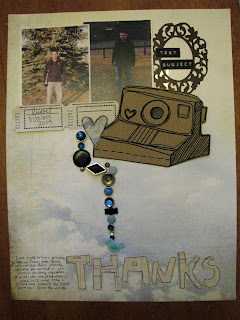
This is what the back will look like. It helps everything lay flat if you keep the prongs all going the same direction and not crossing over each other. The finished layout...I like how my line of brads acts like an arrow, directing the reader from the photos down to the title. Notice how my final line of brads does not match my original sketch. It turns out that the little "loop" I drew didn't really work, so I just erased it and kept going.
 Step Two: Choose some brads from your stash that will go well with your layout, and start laying them out on your line so you get an idea of size and colour placement. Again, this isn't the final step, so feel free to play around with placement until you get something you like. You can change your mind right up until you punch the hole!
 Step Three: Start on one end of your line, and punch a hole for the first brad. I marked my hole with a pencil before I punched it, so I got it just in the right place. Lay your brad over top of the pencil line, eyeball where the centre is, then mark it with a dot. Now make that hole!!
 Step Four: Keep going, one brad at a time until you reach the end. I wouldn't recommend going at it from each sides and then meeting somewhere in the middle. Because then you need to make sure you've got a brad that fits in whatever hole is left! Better you just shorten or lengthen the line based on where you end up.
This is what the back will look like. It helps everything lay flat if you keep the prongs all going the same direction and not crossing over each other.
 The finished layout...I like how my line of brads acts like an arrow, directing the reader from the photos down to the title. Notice how my final line of brads does not match my original sketch. It turns out that the little "loop" I drew didn't really work, so I just erased it and kept going.
The downside to this technique is that your page will be very heavy and large! If you want the same effect, but like to keep things light and slim, use paper or stickers instead. You can punch circles from pattern paper, or any shape really, and accent them with stickers or rub ons. The effect will be the same, but your page won't be so bulky!
I'm planning a whole bunch of classes in the next couple of months. Keep your eye on the TM Classes Blog for more information. Two of theme will feature Techniques I have done here in the past, so it will give all of you, my loyal readers a chance to try this stuff out in person!!
Until next week...
1 comment:
So pretty! I can do this.
Hey, where'd the camera come from?
Post a Comment