

So as of right now, I'm still working out some kinks and putting my limited digital knowledge to the test, but I thought I would publish the new address for the new Treasured Memories Techniques Blog!
Please join me over there to continue your wonderful journey of knowledge and discovery! I already have the first new post up, and I'm excited to share with you all the new items I added!
Treasured Memories Trends and Techniques
And thanks for all your patience and support on this...it's not the easiest thing to do, moving one blog into another, but I hope it was worth the wait!
later skater alligator
Friday, March 26, 2010
Saturday, March 20, 2010
Drumheller Album


It's all built in an old magnetic photo album I found for a steal at Value Village.
Maybe next week Blogger will be more cooperative with me, but right now it's not letting me upload my pictures properly to the new Blog...sorry again for the delay.
Friday, March 12, 2010
Bonus Technique and Some New Stuff!
We have been getting so many new and fun shipments recently! If you haven't been in your LSS lately, now is the time to go! The new CHA product is arriving daily, and there are some great lines to play with!
Today I am using some new KandCompany bling, paper and die cuts. I am not normally the biggest fan of KandCo. stuff, but this time around there are some amazing little do-dads. And there's a bonus little technique within the new stuff...we're making paper flowers!
First, a layout:

 Here I am using some of the new Kand Co. die-cut titles. This cut out type of art is very popular in many online communities, so it's nice to see the scrapbooking world jump on the cart. I'm also using some of their new pearls, that come in a rainbow pack with rhinestones as well!
For about $5 you get four designs in two different colours (see below): white and shimmery

Keep in mind that these detailed cuts don't really carry the same effect on a busy pattern paper...

They look best on solid, as in the demo layout, or a subtle pattern, as you can see below.
 You could also try:
- Using Glimmer Mist or stamping ink to colour the die cuts
- trace the image onto a solid colour, cut it out and then mount the solid colour on the back for a popped out look
******
And now onto our technique.

For the paper flowers you will need:
- pattern paper
- trimmer with cutting and scoring blades
- liquid glue & paper-to-paper adhesive

Step One: Take some pattern paper and cut a strip off. You will see below, that 2" is too wide! Might I recommend 1.5". And it doesn't have to be a 12" long strip...start with a 8"-9" strip for practice. Plus it takes way less time to do a shorter strip!

Step Two: With your scoring blade, score the pattern paper to make your folds. 4/8" is a great size! You will need to do this all along your paper. This is why I recommend starting a shorter strip (8"-9").


Step Four: Now it gets to the fun part! HA! Gather all of your folds together. That is, squish up the strip of paper so it's nice and compressed. Put some paper-to-paper adhesive on the ends.

Step Five: I don't have pictures of the next step because I needed to use both hands! Place the compressed paper on your table and slowly fan it out, bringing the ends together in a circle. Stick the adhesive ends together and hold on!
NOTE: Remember how I said 2" was too wide? Well here's a shot of how that worked out!! You don't want your flower to be too wide, or else it just won't form a proper circle!

Here is what it's supposed to look like! It might take a little fineggling to get this thing to sit flat. And if you have any rips it will be a little bit more difficult!

Step Six: Turn the flower over, back side up, and put a whole dollop of liquid glue in the centre. Try and get it into all the folds if possible.


Today I am using some new KandCompany bling, paper and die cuts. I am not normally the biggest fan of KandCo. stuff, but this time around there are some amazing little do-dads. And there's a bonus little technique within the new stuff...we're making paper flowers!
First, a layout:


For about $5 you get four designs in two different colours (see below): white and shimmery

Keep in mind that these detailed cuts don't really carry the same effect on a busy pattern paper...

They look best on solid, as in the demo layout, or a subtle pattern, as you can see below.

- Using Glimmer Mist or stamping ink to colour the die cuts
- trace the image onto a solid colour, cut it out and then mount the solid colour on the back for a popped out look
******
And now onto our technique.

For the paper flowers you will need:
- pattern paper
- trimmer with cutting and scoring blades
- liquid glue & paper-to-paper adhesive

Step One: Take some pattern paper and cut a strip off. You will see below, that 2" is too wide! Might I recommend 1.5". And it doesn't have to be a 12" long strip...start with a 8"-9" strip for practice. Plus it takes way less time to do a shorter strip!

Step Two: With your scoring blade, score the pattern paper to make your folds. 4/8" is a great size! You will need to do this all along your paper. This is why I recommend starting a shorter strip (8"-9").


In the second photo you can see all of my score marks. Try not to rip through the paper. This will only cause you headaches later...trust me!
Step Three: Accordion fold all of your score marks.


Step Four: Now it gets to the fun part! HA! Gather all of your folds together. That is, squish up the strip of paper so it's nice and compressed. Put some paper-to-paper adhesive on the ends.

Step Five: I don't have pictures of the next step because I needed to use both hands! Place the compressed paper on your table and slowly fan it out, bringing the ends together in a circle. Stick the adhesive ends together and hold on!
NOTE: Remember how I said 2" was too wide? Well here's a shot of how that worked out!! You don't want your flower to be too wide, or else it just won't form a proper circle!

Here is what it's supposed to look like! It might take a little fineggling to get this thing to sit flat. And if you have any rips it will be a little bit more difficult!

Step Six: Turn the flower over, back side up, and put a whole dollop of liquid glue in the centre. Try and get it into all the folds if possible.

And put something heavy-ish on top while it dries.

This is less like a flower and more like a fun pinwheel! And if you call it a pinwheel, you can put it on a boy's layout just as well as a girl's!

Finish it off with some bling, buttons, pearls, whatever you like!
You could also try:
- sprinkling some glitter over top
- inking or sanding the top most edges for a more distressed look
- making a whole bouquet of these in matching colours and different sizes
- putting one on a canvas, picture frame, or headband
Happy Crafting...and I'll see you back here next week...sometime!!
Thursday, March 11, 2010
Road Trip...and a Delay
The mini-fam and I are going on a Road Trip down to Drumheller this weekend, so I have postponed the new Blog Reveal!
But I am planning on leaving you with a little Technique/Trend tomorrow...using some of the new and super fun K&Company product that has newly arrived. Normally I'm not a big fan of their stuff - too many glitter stickers for my taste - but this time around they have a lot of fun vintage-looking die cut packs, stickers, etc. And some great bling...which I love.
See you back here tomorrow...and keep watching for the new Blog! I'm so excited about it!!!
later skater alligator
Friday, February 26, 2010
Postcard Part 3
This is the last postcards technique this week, and my last post until March 13th! I will be working on the new blog...ooh la la!
You will need:
- a bunch of postcards from the same location, or same trip
- Gaffer tape, paper tape, hockey tape (yes!), masking tape, packing tape
- embellishments to finish your layout
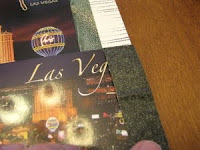
Step One: Assemble your postcards. I am doing this layout on our trip to Vegas last summer, so I pulled all my Vegas postcards to choose from.


Embellish
When you pick embellishments for this layout, keep in mind that anything you add below a layer will add more depth, so you don't want any embellishments that have a lot of height to them. Rub ons and stickers are great to use inside your layers. And they come in lots of fun colours and shapes and sizes, so that you can't go wrong with whatever theme you are working on.


Lisa's Extra Special Note: Regarding "Themed" Layouts
I know a lot of scrapbookers out there love to use themed products on their themed layouts. But I am here to tell you that it doesn't always have to be that way! We had a customer at our crop last week who was working on her Vegas pictures and she was really disappointed that we didn't have any Vegas embellishments for her to use.
From my point of view, most Vegas embellishments are "tacky" and are never the right colours for my layouts. And don't represent what I think of when I think "Vegas". But you can't tell a customer that...you have to help them find other options that might work for them! She went back and looked through her photos and was struck by how much yellow was in them...from all the bright lights. So she found some fun yellow embellishments to accentuate her layouts! YAY!
So if you want to scrapbook some farm pictures, you don't always need a red barn or a cow sticker...sometimes a nice leaf or flower in the right colour, with some gingham ribbon will do the trick! I scrapbooked a whole whack load of my Vegas photos without a Vegas-themed sticker in sight...and I love them all!
*****
So this is my last post for awhile. I will be back in two weeks on the new Blog. I'll put the link up here so you can find me there! I'm very excited! I haven't really customized this Blog since Juli and I first did it up. The new one will have all these "old" techniques for you to look through, as well as other interesting links and places to check out on your Internet Travels.
Until then...Happy Creating!!
You will need:
- a bunch of postcards from the same location, or same trip
- Gaffer tape, paper tape, hockey tape (yes!), masking tape, packing tape
- embellishments to finish your layout
Step One: Assemble your postcards. I am doing this layout on our trip to Vegas last summer, so I pulled all my Vegas postcards to choose from.

Step Two: Choose three postcards from your giant pile that you are going to use. I picked three that I like the most and said the most about my trip. We stayed at the Luxor, and I the Paris Hotel & Bellagio fountains were my favourites. You can now choose paper and embellishments to "match" these postcards. See my note about that at the bottom!

Step Three: Decide how your postcards will be layered. Think about what you want to see first thing, then layer the postcards from there. Think about which way you want them to fold and flip - up, down, left, right - and make sure there is enough room for tape in between them and along the edges. Here is my order starting from the bottom:


Step Four: Pick a non-postcard image to layer on top. This gives a place for your title, unless you want to use the words on one of the postcards for that. It also provides a little rest for your eye from all the busy-ness of the postcards below. I chose this packaging from an American Crafts buttons set. And since it had product description on the back, I covered it with some lined paper from Sassafras.


Just trace the shape and then cut out. Then glue it on the back. Same goes if you choose pattern paper or something else to adorn the top of your layout.
Step Five: Now we start taping. Grab your tape of choice - mine is the new 7Gypsies Paper tape. It comes in some fun colours and patterns and is really easy to use!

Start with the paper or postcard that is on the top layer. For me, that is my American Crafts packaging. Measure your tape so it is no longer than your paper/postcard. It can be shorter, just not longer...once you flip your postcard you will have a sticky tape end sticking out, and nobody wants that!

Mark the tape where you want to cut it (see the black arrow in the photo). Cut your tape. Then peel off the backing.
Stick the tape onto your paper/postcard and the background paper. Line up the paper/postcard so it's as straight as you can get it...you could use a ruler or measuring thingy, but I prefer to "eyeball it"

Once you get the tape down, fold open your postcard and press down along the crease. This will help the postcard fold better, and make sure the tape is nice and secure.
Now tape down the next layer. For this postcard I had some text that was right along the edge, and I didn't want it to be covered. So...I just mark my cut below the title.


Remember, that your tape can be shorter than the edge of your postcard, just not longer.
As you go along, keep closing the top layers to see where you're at. The postcards and paper can shift around and you want to make sure they all get into the right place. This also helps make sure you won't get stuck on the last layer and not have enough room for the last postcard!
Here are all my postcard layers after they've been taped down, but before I did any embellishing.

Embellish
When you pick embellishments for this layout, keep in mind that anything you add below a layer will add more depth, so you don't want any embellishments that have a lot of height to them. Rub ons and stickers are great to use inside your layers. And they come in lots of fun colours and shapes and sizes, so that you can't go wrong with whatever theme you are working on.
I chose Hambly lime green lace rub ons, and black American Crafts stickers. With some shiny stars to compliment the shiny lights of Vegas!
Here are some pictures of each finished layer, starting from the bottom. And of course Blogger picks now to rotate some of my pictures again...hoorah...


And the very front. I kept it simple and let the postcards be my title. You can see I carried some of the lace rubon detail between layers.

The background is made using a Prima Background stamp and some "black" ink. Just ink and stamp...all over. It's best on this layout to use a simple background...plain cardstock or a really simple pattern work best. Otherwise it gets too busy.

Lisa's Extra Special Note: Regarding "Themed" Layouts
I know a lot of scrapbookers out there love to use themed products on their themed layouts. But I am here to tell you that it doesn't always have to be that way! We had a customer at our crop last week who was working on her Vegas pictures and she was really disappointed that we didn't have any Vegas embellishments for her to use.
From my point of view, most Vegas embellishments are "tacky" and are never the right colours for my layouts. And don't represent what I think of when I think "Vegas". But you can't tell a customer that...you have to help them find other options that might work for them! She went back and looked through her photos and was struck by how much yellow was in them...from all the bright lights. So she found some fun yellow embellishments to accentuate her layouts! YAY!
So if you want to scrapbook some farm pictures, you don't always need a red barn or a cow sticker...sometimes a nice leaf or flower in the right colour, with some gingham ribbon will do the trick! I scrapbooked a whole whack load of my Vegas photos without a Vegas-themed sticker in sight...and I love them all!
*****
So this is my last post for awhile. I will be back in two weeks on the new Blog. I'll put the link up here so you can find me there! I'm very excited! I haven't really customized this Blog since Juli and I first did it up. The new one will have all these "old" techniques for you to look through, as well as other interesting links and places to check out on your Internet Travels.
Until then...Happy Creating!!
Subscribe to:
Posts (Atom)