

The scrapbooking world has really embraced stamps as another awesome way to embellish and enhance layouts. You can buy large sets of flourishes or frames, and even more popular are the $1 - $2 single stamps. And as always, letter stamps are a great investment. Especially for those of us who aren't into personal die-cut systems.
For this Techneek of the Week, I am going to go over two possible ways to use stamps on your scrapbook layouts. And I apologize now for all the photos I uploaded...Blogger flipped most of them!! Oops! And this is a very picture-heavy post, so you'll just have to bear with me! Thanks.
Techneek #1: Embossed Background
You will need:
- A stamp to use as a background...I am using a Heidi Swapp foam polka dot stamp. These work really well with paint, but I am going to show you how to use it with embossing powder!
- An embossing stamp pad...VersaMark, etc.
- Black embossing powder...or whatever colour matches your background cardstock
First, choose the colour of cardstock you want as your background. I chose black, because I always like to have a neutral background (white, kraft, black). I wouldn't choose white or kraft for this, but any other colour would be great! Make sure you have embossing powder in the same colour OR some clear embossing powder and a good clean embossing ink pad.

Grab your background stamp and get it covered in embossing ink. I chose polka dots because they look good when repeated over an entire background.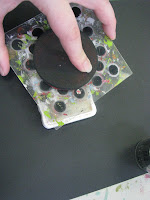
Once it's covered in ink, press it down on your background. It helps to start in the upper corner and work your way down and across in order to cover the entire background. I'm not too worried about getting all my dots to line up perfectly (am I ever worried!!), but if you are you might want to use a ruler or a special tool to line your stamp up each time you press it down.


After you've stamped your image once, sprinkle your embossing powder over the wet ink, and tap off the excess. You don't need to use your heat gun right away...we are going to get the background fully stamped and powdered up and emboss it all at once.


So keep stamping and sprinkling your embossing powder on until you have sufficiently covered your background. Like so...


Now you can run your heat gun over the whole background and set the powder.


And now you have a super cool background! All shiny and nice!


Now I will show you how I finished my layout...using some more stamps. If you would rather do your own thing, go right ahead! But don't forget to check out the next Techneek...just keep scrolling down!
To finish my layout, I wanted to use some more stamps to accommodate my journaling and add some more interest to my layout. I also wanted to include some colour, but only in the pattern paper so I used black ink and kraft paper for my stamped images.
Grab some journaling stamps in a variety of sizes and shapes. Most of mine are circular or oval in shape, to match the polka dots in my background, but you can use whatever you have on hand!

Here I stamped my journaling stamps on some kraft paper. Cut out your shapes and put them aside.

Now I want to show you a neat technique involving ripped paper! You might have noticed that I left some blank spots on my background. I wasn't worried about covering every inch of my black paper because I knew I wanted to cover parts of it with my pattern paper (and my photo...duh!). When done right, this will look like the pattern paper was actually on top and you just ripped pieces of it away to reveal the cool embossed paper underneath! WOWEE!
To start, pick some pattern paper and choose where you want it to be. It's easiest to add the pattern on the edges first, then add some in the middle of the page if you want to (I only added it along the edges, so for in the middle you're on your own!!).

Mark on your pattern paper where the edge will be (the edge of the background paper). Now you can tear your pattern paper.

It doesn't have to be perfect the first time. You can keep tearing away bits until you have a look you like.


I even rolled up some of the torn edges to further enhance the look. You could also crumple and ink your pattern paper.


Here's the finished torn piece of paper. I crumpled it up and rolled the edges to make it look really ratty!


Stick it down, and find another spot that could benefit from some torn paper action. It helps to know where your photo is going to be on the finished layout.


Now here is where your journal stamps come into play...position them on the background so they can be used in sequence to tell your story.


And I can't believe I didn't take a picture of the finished layout! DUH!! I will try to find that for you guys before the day is over!
Techneek #2: Stamps as Embellishments
You will need:
- A single image stamp...make sure it's not too complicated and can be used in multiple locations on your page. I am using a Heidi Swapp chandelier. A simple shape like a heart, star, tree, animal would be great as well.
- Black ink pad
- A liquid glue pen...this works best to apply glitter to a detailed image (like a stamp). I'm using one made by ZIG
- Glitter...I am using gold Melissa Frances, but any colour or brand will do.
This one is super easy, and might even seem a little bit obvious. But I thought I would get my two cents in here, and show you how Lisa works the stamps!
I am a big fan of repetition on a layout. By repeating the same colours and embellishments you unify the layout and make it easy on the eyes, a treat to look at! And if you repeat things in a triangular pattern, your viewer's eye will know where to look and what is important on your layout. It's a simple thing that can make a big impact. The next time you look at one of your favourite scrapbooker's layout, see if she is repeating the same elements in various locations on her layout and where.
First you will need to gather your supplies...and start stamping! I stamped my chandelier image on the same pattern paper as I am using for my background. I want the image to stand out, but not too much! The Basic Grey "solid" works great for this! Stamp three images...two will remain black and one we are going to add some pizazz to with some glitter!

PLEASE NOTE: Putting glue on your stamp before stamping it and applying the glitter DOES NOT WORK! Trust me...I tried it. And as Jill predicted, all I got was a glue-blob on my layout and the glitter didn't stick. I do all the dirty work so you don't have to! Tee Hee!
Now you can "draw" on your stamped image with your glue pen, a little at a time, and sprinkle the glitter over it. Tap off the excess and keep going until you have covered the entire shape with glitter.


And now you've got a sparkly shape that you made yourself!! Ooh la la!

Cut out all three of your shapes...it doesn't have to be perfect, just get the basic shape.

And place them on your layout in a triangular pattern. I added some Hambly transparent frames for a little colour. (Crooked photo alert!)

Now you can finish embellishing your layout. If you focus on adding embellishments to the areas around your stamps, you will just reinforce the triangular pattern and make your layout more unified and good-looking!!


I hope you enjoyed today's Techneek. There are so many different ways to enhance your scrapbooks with stamps, I just picked two of my favourite for today. I will be coming back to this topic in the future, no doubt, and hopefully I'll give you another reason to dust off your stamps and create!
Later,
P.S. I totally have a project in store for you this weekend...it's a repeat, but still good! With instructions and everything. I promise!!
No comments:
Post a Comment