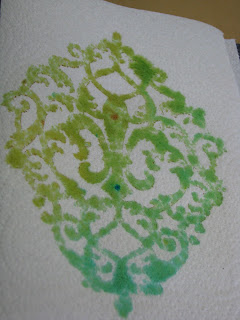
The Glimmer Screens come in these large packages, in a whole whack load of shapes and sizes...I'm using one of the filigrees for my demo.

Choose your Glimmer Mist colours. For this project I used Daffodil, Jazz Blue, Seafoam and Key Lime green. You can use as many, or as few, as you choose.

Try experimenting with different colour combinations. You never know how something is going to look until you test it out!! The store carries 64 colours with 18 new ones on the way. So there is sure to be one or two that catch your eye!!
Place the Glimmer Screen on your paper of choice. I am using solid white Bazzill cardstock, but it works on any colour, texture, and looks really cool on pattern paper too!
Note: In my demo the Glimmer Screen looks brown, but they are actually the colour and texture of a 4 litre milk jug! The plastic makes them really easy to wash off after use, which I didn't do after using it on another project. You should always wash your Glimmer Screen after you use it, or the colours will bleed into your next project.
Protect your work space with some leftover Treasured Memories paper bags, or newsprint, or cardboard. Apply your first colour to the page. I started with my lightest (daffodil), and only covered a small area in a light spray. It's easy to add more colour later, but impossible to remove colour. Start with your bottle farther away from the page, to get a lighter mist. If you want a deeper colour, move your bottle closer, or do a couple extra sprays. You don't have to let the Glimmer Mist dry between colours. They will blend together better when still wet.
Next I added some Key Lime green Glimmer Mist.
Then Seafoam
And then Jazz Blue
I kept adding more colour until I had the look I was after. Then I (carefully) removed the Glimmer Screen!
Try This: While the Glimmer Screen is still wet, press another sheet of paper onto it. And now you have a Glimmer Screen-Stamp!!
The finished product! Just by adding some ribbon, pattern paper, a couple of flowers and a silver brad, I have a shimmery, beautiful page. Everyone will be asking you how you got your paper to look so wonderful!
You can also use part of your Glimmer Misted paper in place of a pattern paper. On this page I cut around the image on the full sheet of paper, and used it as I would any other pattern paper. And I still have the rest of the Glimmer Misted paper to use on another project. The possibilities are endless!
 Please note: Because Glimmer Mist is water-based, it will curl your paper. Once it has dried you can flatten it by putting it under some heavy books or using your hands to mold it back into shape. I don't think there is a way to avoid this side effect. Even using a small amount of Glimmer Mist will cause your paper to warp a little.
There are other options if you don't want to purchase the Glimmer Screens. These are Heidi Swapp masks, that work with paint as well as Glimmer Mist (or Ranger Colour Wash, which is similar to Glimmer Mist, but without the shimmer!). They come in a variety of patterns (pictured are the ones we have in stock right now) and are self-adhesive so they won't pop off while you're applying colour!
 You could also use mesh ribbon as a screen, or the background of a chipboard/die cut letter sheet. Just pop out any leftover letters, place the whole sheet on your paper, and spray. KI Memories also sells "die cut paper" that would work lovely as a screen. And you could use your newly coloured paper on a layout once you're done using it as a screen!
And if you want to see Glimmer Mist and Glimmer Screens in action, watch Global TV (in Edmonton) at 7:09 on Monday morning for a "live" demo with our very own Chantel!!
Check back next week for another Techneek and our first TM Project!!
Until then...


No comments:
Post a Comment