I am just now realizing I never actually finished last week's Techneek...duh. So once I'm done with this guy, I will post instructions for creating your own background. I am a doh-head, fo' sure!!
Anyhoo, on to today's topic: Flower Clusters. Any of you who are familiar with my style know I love a good cluster of embellishments. But you may be wondering, why flowers? I am not known for my use of flowers. In fact all the girls at the store laugh in astonishment when I tell them I'm running low on flowers in my own stash. I know. Very hilarious! Yes, I have a little boy, and most of my scrapbooking is about him, but there is a place for flowers on any layout!
And this week I want to show you how to create a beautiful cluster of flowers, sure to be a hit on any layout. I've done up two "versions" to show how altering a couple of elements can create a whole new look with the same basic idea. Pictured below is my inspiration. Prima sells these fun, pre-made flower clusters...but I am really not keen on the colours. So I figure, why buy these when you can make your own that perfectly fit your project!?

You Will Need:
Flowers. Lots and lots of flowers.A swirl. I used two different kinds: Riff Raff chipboard and one I made from cardstock. It's up to you which one you choose to try. I will show you both. You will need black paint, embossing powder or some fab Glaze pens if you follow my technique for decorating the chipboard swirl.Brads, buttons, snaps, etc. to put in the centres of your flowers (if you so choose).The Basics: glue dots or liquid adhesive for your flowers, scissors, a pencil.Version One
First things first...pick a whole handful of flowers that fit your colour scheme. I'm using the new Prima collection here. You might not use all of the flowers you pulled, but this gives you some choice with size, shape and colour. And you want a nice variety...don't just grab a handful of small pink daisies . It just won't have the same feel.

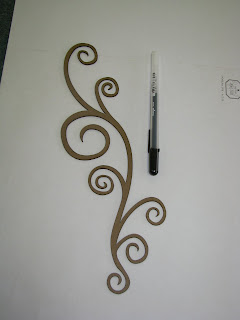
For the first layout, I'm using the Riff Raff Designs giant swirl chipboard shape. It is totally awesome, and the perfect size for a 12x12 or 8.5 x 11 layout. Now, decide how you would like to colour this. I am using the Sakura Glaze pens here. They are super easy to use (it's just a pen people!!), and give the effect of a shiny embossed surface without all the powder and ink pads.
 Just start at the top, and work your way down, colouring in the entire surface. This was a pain in the butt and I totally got a cramp in my hand, but it was also worth it!
 Next, position your swirl on your layout. I had already picked my paper (Prima transparency over black cardstock) and knew where I wanted my picture (it's that white 4x6 piece of cardstock in the centre there...I didn't have my picture at work when I was doing this up!!), so I adjusted my swirl to fit beside the photo. You can go ahead and stick this down, as we are going to layer the flowers over top of the swirl.

I just started placing flowers on top of the swirl, moving them around until I had a good mix of colours and sizes. A good way to start is by grabbing a bunch of flowers then letting them fall on to your layout. And wherever they land is where you stick them down (unless they land right on the photo!). Don't cover all of the chipboard swirl, or else it defeats the purpose of using it! Pull off any flowers that don't make sense where they are, or look out of place because of their size or colour.
I started with the larger flowers near the base of the swirl. Then added some smaller ones in coordinating colours. I put the brads through the flowers BEFORE I started placing them on the layout...this makes it easier once you want to actually adhere them. You don't have to disrupt your entire pattern by trying to poke a hole. Just stick them down with a glue dot or liquid adhesive once you know where you want them.

And the finished product.

Version Two
For this layout I used some new KI Memories paper as my inspiration. Even though the paper didn't make it to the finished layout, it was a good starting point for choosing the flowers from my stash. I wanted it to be bright and funky so I went with a nice lime green, teal blue and hot pink.
Extra Tip: If you can't find the flowers in the colour you want, buy white or ivory ones and give them a coat of Glimmer Mist. Heck, you could even do this if you like the colour. A little shimmer never hurt nobody!!

In this version I am going to put the black swirl ON TOP of my flowers, so my first step was to place my flowers down. Keep in mind where your photo is going to be, and if you are going to want to add a title or other embellishments. I am doing another 8.5x11 layout, so there isn't much room for anything else on the page.
I started with the larger flowers at the base, and layered smaller flowers in and around them, and up the page. Try to make a corner out of flowers...this gives your photo and page a nice frame and keeps the eye on the focal point, which will be the photo that sits just above the flower cluster.

Once you have a nice, full looking cluster, glue your flowers down. I didn't use any brads in the middles for this version, and I used a lot more flowers than on the first layout. Remember, I'm going for a really bold look here!
Now, grab your black cardstock, and a pencil...we're going to do some drawing! This doesn't have to be a perfect swirl...but you do want it to "match" the shape of your flower cluster that you have already made. I "eyeballed it", and tried to copy the basic shape of my flower corner the best I could.
Now lay your cut-out swirl on top of the flower cluster. Adjust it's position until it looks like it makes sense, then glue it down. Liquid adhesive works well here, because it is easy to apply to the thin paper swirl, and will stick to the flowers without a problem.

I added a couple of extra black flowers after I adhered the swirl , just to balance things out a little bit, and fill in some of the blank spaces. To finish the layout, I drew a line around the entire layout and around the spot where my photo will eventually go.

Thanks for playing along this week. I have the email instructions ready for the Prima clear mini album, so for those of you who requested them, check your e-mailbox tonight! I will also get to the instructions for last week's Techneek...once my hands warm up. It is SO COLD in my basement it makes typing difficult!
later gator


