Thursday, January 15, 2009

TOTW - Rockin' the Monochromatic

I don't know if you've noticed, but I really like monochromatic colour schemes on my layouts and projects. I usually stick to one colour or colour family, with a dash of a contrasting colour to liven it up. With all the snow we've been getting up here in E-town, I thought I would share a fun way to do a white layout.

The key to pulling off a white layout is texture...and lots of it! If you are using multiple patterns and textures on a colourful page it gets too busy and your eye doesn't know where to focus. And it just ends up looking bad. But on a monochromatic page, as long as your different patterns and textures are the same colour it looks good!


You will need:
  • White cardstock for your background
  • White embellishments: I like ribbon, tulle, mesh, felt - things with texture. Grab some buttons and brads as well.
  • Anything else in your stash that's white, like chipboard letters, tags etc.
  • White paint and bubble wrap...to create the texture in the background
  • A text stamp and a light-coloured ink pad. I'm using a light blue because it goes well with the blue sky in my photos.


The key to this techneek is to keep adding layers until you have something you're happy with. I started with a big pile of white things and then tried the ones I thought would look good, and set aside the ones I didn't like. You won't use everything in your pile, but it's helps to get you started.


Tip: When applying paint to your bubble wrap, squirt a big pile on then spread it around with a popsicle stick. Works super.


I applied the painted bubble wrap all over the background paper. Press down, then lift it up, move it over, and press it down again. There's no need to apply more paint in between each application. It looks better if the bubbles are uneven.


I used the text stamp sparingly, and only to add some extra colour and texture behind my photos, kind of like a photo mat. It helps if you remove some of the ink before stamping it down on your paper...you can always add more but you can't take away.


And here's the finished layout...the colours look kind of wonky because I took these photos in my basement. I will re-take them tomorrow when there's some good light outside! You can click on the photo to get a better look. I love how the focus is totally on the photos, because everything around them is in the same muted tones of white and off-white.


Tip: I took these boring white chipboard letters and jazzed them up by pressing them into the still-wet bubble wrap! Sweet!


I'll try and get something done for the project on Saturday...Juli is super busy with school, work, work and her new Wedding Planning business! So while I wish her the best of luck I miss her help!!

Tuesday, January 13, 2009

Wooden Star Project

This Just In...the store. We have a whole new batch of shapes from Letters by Janna, and they are awesome! I couldn't help myself, and took home a star before I even knew what I was going to do with it! But now I'm glad I did, because it turned out beautifully.


This project is great for new babies, housewarmings, or just because. The shapes come completely unfinished, so you can decorate them in whatever way you'd like: crazy like mine, or with just a coat of paint or stain.

You will need:


  • Large Wood Shape: Right now Treasured Memories has two sizes of hearts and stars, and three sizes of flowers, but you can also order them directly from Letters by Janna. I am using the smaller star ($16) for my project. The large star and heart cost $21.

  • Gesso/primer: I used gesso to prime the surface before I started applying the papers and ink, but any kind of primer or white paint will work. This just gives a nice even surface to start on.

  • Pattern papers: scraps work great for this, as you are going to rip and tear them and if you cover them in more paint the colours and pattern will be muted.

  • Paint: I used white paint (gesso works for this as well), green and blue. Any craft or acrylic paints works well here.

  • Matte Gel Medium: I use this to adhere all of the pattern papers, and seal them. White glue works to adhere the papers, and you could use any kind of varnish or sealer (water-based) that you have on hand. Matte is just my preference.

  • Glimmer Mist, foam stamps, rubber stamps, letter stamps, chipboard shapes, charms, etc. Grab anything you might want to use to further embellish your shape once you have the base down.

Here are some close ups of the shape.


And the charms at the bottom. I am a big fan of hanging things off other things. So I attached some dangly things off the bottom of the star with some wire.


I will post some step-by-step pictures later in the week, so check back. I'll also have something fun for the Techneek of the Week in Thursday!

If you have any questions about this, or any other project or Techneek, feel free to email me! lisakercher@gmail.com

_____________________________________________

I am looking for class suggestions...layout, mini-album, technique, etc. You can email me with your ideas. This will help me out SO MUCH in planning next month's schedule. Thanks!

Thursday, January 8, 2009

TOTW - Challenge Me!

If you've ever visited my personal blog you'll see that I love a scrapbook challenge! And there are so many blogs and websites that I can visit to get my fix! I haven't been participating in a lot of these lately, but in the past whenever I was in a creative rut, or needed a jumping of point for a difficult set of photos, or even when I was just in the mood to have some fun I can turn to any of these sites for a little inspiration and a kick in the butt!

And now with the New Year upon us, so many of us are setting goals relating to their scrapbooking: getting more layouts done, taking more/better photos, spending more time with my scrapbooking buddies, etc.

SO, as the first "Techneek" of 2009 I am issuing a challenge to all of my readers out there... pick one of the Challenge Blogs below (or find one on your own) and TAKE THE CHALLENGE!! Then post your layout on your blog, or on Flickr, or on SIStv, or anywhere, and link it up in the comments here. I can't wait to see what everyone picks!

Here's my list of favourite Challenge/Inspiration Blogs. Some I have been visiting for a long time, and some I've just discovered recently through other sites and other bloggers. Regardless of your taste in scrapbooking, there should be something here for you! And if your favourite Challenge Blog isn't on my list, let me know!! I would love to add it!


And here is my completed challenge layout! I took the Scrapjacked Challenge. Essentially, these lovely ladies post a layout by another scrapbooker, and your challenge is to "scrapjack" it (aka "scraplift"). You can take elements of the original layout (colour, design, theme, etc.) and reproduce them in your own style.

You'll notice how I took the original design of the photo grid and changed it a little to fit my 6 pictures (instead of 11).

I also "lifted" the cute coloured doodles on the original. I used some of Lucas' crayons to colour in my scrap-graffiti.


And finally, I loved her use of the label maker to add captions to all of her photos...but I used mine to add more interest to the title block!


I hope you had fun playing along with my mini-challenge. Check back next week as always for another post from me! And I think we might even have something fun for you on Saturday...a little project to start the new year off right!

Later...

Thursday, December 18, 2008

And the Winners Are...

Lisa S

and

Angelheart


Congratulations Ladies! I'll leave your prizes at the store tomorrow and you can pick them up at your leisure.

And since next Thursday is Merry Christmas time, you won't be hearing from me until the New Year!!

Until then...

TOTW - Sparkle & Shine

Now I'm not usually a "sparkle person" but when it's starts to snow, and the malls have put up their Christmas decorations, and there are twinkly lights everywhere, I get a little excited!! Why not let that inspire my scrapbooking process??

This week I'm going to show you four ways to bring the sparkle of the season into your scrapbooking layout!!

You will need:


  • Tattered Angels Glimmer Mist in a colour of your choice - I used Daffodil for this project

  • Tattered Angels Glimmer Screen - or some other mask

  • Variety of colours of rhinestones/gems/bling. I used Doodlebug red and brown, and Kaiser Crafts peach

  • Prima rhinestone swirls

  • Buttons

  • A chipboard shape - I used Riff Raff Designs hand

  • Glitter - I used Melissa Frances, which comes in a pack of three colours, but any glitter will do. We also carry Stix2 & Doodlebug brands, but I've heard that the Martha Stewart stuff is amazing!!

  • Stickles in a variety of colours to match your layout

Techneek #1: Glimmer Mist
I think I've covered this Techneek before, but here's a little refresher!

Grab the Glimmer Mist you chose for your layout, and a Glimmer Screen or mask.


Lay the mask down on your layout and spritz the Glimmer Mist all over it, and around it, BUT don't cover the whole page with Glimmer Mist. Carefully move the screen to another part of the layout and spritz with Glimmer Mist.
Do this one more time (or two if you're doing a 12x12 layout) until you have the design repeated on your layout. It looks great if you offset them a bit and let some hang off the edge, so it looks like you cut your sheet from a larger sheet of pattern paper!

You could also try:

  • Adding a second accent colour around the edges. Do the base colour (a light colour or a neutral like silver or gold), wash off the Screen, then reapply it in the same place and spritz with a new colour!

Techneek #2: Rhinestones

Start off by pulling together a whole bunch of rhinestones/bling from your stash that might work on your layout. You can pick and choose from this pile once you start putting your layout together. I chose browns, reds and golds that went with photos I had in mind.


Pull together some pattern papers for your stash that match your layout and the rhinestones you picked. They don't have to be a perfect match, just similar in tone.
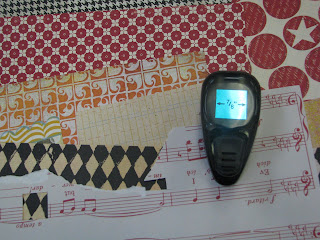
Now punch out one square per pattern paper. Try and find a unique pattern within the pattern that will look good in a little square! Make sure you have enough to run down the entire page, with a little space in between.

Arrange your punched out squares, and adhere to your layout. Notice how they are a little crooked...you don't need your ruler for this part!

Now take your pile of assembled rhinestones/bling, and add some to the squares. Think of each square as a mini layout. Don't be afraid to add words, buttons, brads, rub-ons, etc. to add some sparkle and interest to this side of the page, as the other side will remain fairly unadorned. You don't need to decorate every square!

Finally, to unite all the elements on the page - the black in the paper and in the photos, the bright red of the lights, and the bling - I added a Heidi Swapp clear title block, a Creative Cafe felt word, and a beautiful Prima bling swirl. These guys are super easy to use, as all of the rhinestones are stuck to each other with a practically invisible plastic piece, so you don't need to glue on each rhinestone individually! This finished off the page nicely, and makes my title stand out.

And the finished layout...all I need to do is add some journaling, and I'm ready to put it in my album!


There are so many ways to add rhinestones to your page. If you remember last week's Techneek, I used some to add sparkle and dimension to my Button Border. They also look great in the centre of a flower, or on top of a large brad.

Techneek #3: Glitter

Choose for yourself a nice chipboard shape, and some glitter. You should also lay a sheet of scrap paper down on your work surface to collect the glitter so it doesn't get all over the place.


I like using the ZIG Two-Way glue pen for glitter (and flocking) projects. It adds just enough glue, and since it doesn't dry immediately you have some working time. Start in one corner of the shape and add glue to a small area.
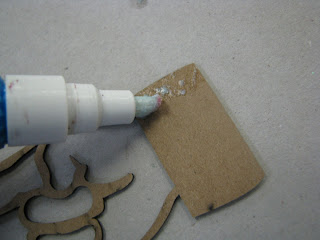
Then sprinkle your glitter over top of the glue. Tap off the excess, and start on the next patch. Add your glue, then sprinkle on your glitter.


Keep going until you have covered the entire shape with glitter. Look how pretty!!

And here is the layout I built my hand shape around. I really wanted the hand to stand out on the page, and what better way to do it than with a little sparkle! It also bring attention to the red in the photo and reminds me of marquee signs, which is reminiscent of the theme of the layout!


You could also try:

  • Adding some glitter to a clear shape. The liquid glue dries clear, and if you use white glitter you get a really whimsical effect.

  • Create your own design on your background using PVA glue. Stix2 PVA glue has a nice metal tip so you could do an intricate swirl, add some glitter and have a beautiful hand-made background!

  • Using some of the *new* Swarovski Crystals we just got in! Boy do these guys SPARKLE!!

Saturday, December 13, 2008

Sick.

I am very sorry I have been sick for the past couple of days and I haven't been able to do much. Enjoy the time off and go and wrap some gifts or bake some cookies! :) Have a great week.

Thursday, December 11, 2008

TOTW - Button Border

What fun!! I know this Techneek will appeal to all the Button-Lovers in our audience! And I know there are some hoarders, I mean collectors, out there who would appreciate this one as well!

A button border is a simple way to create texture, and a super way to direct your eye to your photo or title, the focal point on any layout!

You will need:

  • A bunch of buttons from your stash

  • Glue dots


Step One: Collect a handful of buttons from your stash that match the paper(s) you are using in your layout. I'm using some NEW buttons from the NEW Creative Imaginations Creative Cafe line we just got in to the store. It's super-awesome, because you can buy one button if you only want one. Or one tag, or one felt shape, or one felt word! Or five or ten...however many you want! And this way you can also mix-&-match your supplies based on the colours you need, not on the colours that the manufacturer thinks you need!


Step Two: Start assembling your button border directly on your layout where you want it to go! Don't stick anything down yet...we just want to get an idea of what looks good where. Use a variety of large and small buttons, different colours and and different shapes/styles if you can swing it. Try layering small buttons on top of larger ones.


Try and use it to define a border between pattern papers, or above or below a photo. The buttons provide a great "arrow" pointing out the focal point of my page - the photo!


Step Three: Once you have a look that you like, a nice combination of large and small, start gluing them down, one at a time. Add your title, and you're done!


You could also try:

  • Adding some rhinestones or bling along with the buttons for a little more sparkle!!

  • Stitch your buttons directly on your page (using embroidery floss and a needle)

  • A simple line of same-coloured buttons in different sizes
_________________________________________________

Another contest!!

Since the last one was such a hit, and I am in such a giving mood with the holidays coming up, I'm having another contest!

Post a comment below, stating your favourite Holiday Tradition and you're entered to win one of two prizes!

I'll post the winner with the Techneek of the Week next week before I take a little holiday break!